
You are probably reading this guide because you’re thinking about building your website from scratch. If that’s the case – you’ve come to the right place!
Even before I start telling you about the easiest way to build your website, let me say that there’s nothing to be afraid. These days, almost anyone can create an amazingly designed website for any purpose.
- You don’t know anything about coding, or tools like Illustrator or Photoshop?
- You think that you’ll spend too much time on this project?
- Are you afraid it’ll break the bank?
The answer is – no! In fact, you’ll have a blast designing and building your website and perfecting every single aspect of this project.
Let me tell you what we’ll discuss in this guide.
- First, I’ll introduce you to Content Management Systems (CMS) and tell you how they can make your life easier.
- Then, we’ll talk about choosing the right kind of domain and hosting.
- Finally, we’ll talk about creating your very first website by using a predefined theme, modifying it and adding your content.
Trust me when I say that you’ll have your site up and running in no time.
Without any further ado, let’s jump to our first step.
Content Management Systems – Simplified
Just a couple of years ago, there was no way that an average computer user could run a website. This is because running a website included knowledge about coding, among other things. So, why are things different today? Well, that’s because of Content Management Systems (CMS).
Don’t be afraid by their somewhat intimidating name. Content Management Systems are your website’s background where you adjust its appearance and add new content. I like to say that if you have any experience writing and formatting in Microsoft’s Word, you’ll have no problem adding new Web content and formatting it.

Without complicating the explanation, let’s say that you absolutely need a CMS. Lucky for you, they are (mostly) free of charge and incredibly easy to use.
However, every CMS is a bit different. So, which one should we pick? Here are the best options: WordPress, Joomla, and Drupal. These are the three most popular ones, and all of them are free-of-charge. However, one of them stands out, and that’s WordPress. Let’s see why.

WordPress and WordPress ONLY! Here’re the Reasons:
Simply said, WordPress comes with everything you might need to build your website – and even more than that. This is an amazingly powerful CMS that is also very intuitive and easy for use. Here are my reasons why you should end your search for a CMS with WordPress.
- The Most Popular Platform – Worldwide
WordPress is by far the most popular Content Management System. It powers close to 75 million websites, comes in 40 different languages, and has tens of thousands of incredible themes and plugins.
- Ease of Use
There’s a reason why WordPress is widely used. That’s because it’s easy for use. Newbies and inexperienced website owners can easily find their way around this CMS. There are no confusing technical terms, it doesn’t require any coding, you can make modifications incredibly easy, and it’s free of charge!
- Incredible Versatility
WordPress doesn’t have any limitations. You can build a personal blog, business website, photography portfolio, or anything in between. There isn’t a type of website that cannot be created using this CMS. In fact, some of the big names like CNN, Mozilla, and eBay all use WordPress to power their websites.
- Supportive Community
What I like the best about WordPress is its vibrant community. Thousands of developers and Web designers are building plugins and themes that are often free of charge. In case you ever get stuck, there’s help around the corner. This CMS also has a helpful community of users that can help you in the event of any issues.
- Completely Free of Charge!
It sounds unbelievable, but WordPress doesn’t charge anything for using this platform. This means that the only costs are domain name and hosting – both of which are often priced at a couple of dollars per month.
Needless to say, I will be using WordPress throughout this guide as the Web publishing tool. I will teach you how to activate WordPress, pick a theme, and modify it according to your needs. Finally, you will learn how to add new content.
Let’s continue with the second step of our journey where I will take you through choosing a domain name and hosting.
Find an Online Home for Your Website
Having a website includes two things – having a domain and hosting. In all honesty, WordPress.com offers a free domain and free hosting. This means that you can build your website without spending a single dollar. However, let me tell you why that’s a terrible idea. But first, let’s learn what’s WordPress and what’s WordPress.com.
As I explained before, WordPress is an amazingly capable CMS that’s free of charge. You can think of it as an application that you download to your computer and install online as a backbone of your website. On the other hand, WordPress.com is a website (service) where you can sign up for a domain and hosting, and automatically proceed using this platform.
If you opt for WordPress.com, you’ll end up with a domain like www.yourwebsite.wordpress.com. As you can see, it comes with an extension which doesn’t look professional since this is a sub-domain. Besides, you’ll end up with a free hosting that often has problems with speed and performance.
This makes it very hard for your website to rank high on Google and other search engines. Maybe this would be a good idea if having your website is expensive, which isn’t the case. Since you’ll spend only a couple of dollars on having your domain and fast hosting, there’s no justifiable reason to pick WordPress.com.
What’s Domain and Hosting, In the First Place?
Before I teach you how to find your domain name and hosting, it’s important to understand what these things are. Let’s break it down:
This is your website’s URL address – or simply said, this is your site’s name (address). Your domain is going to be yourwebsite.com when you register. You can also choose another suffix instead of .com like .net, .org, and numerous other.
You also need a place for your website’s files. Websites live on servers that are always powered on and connected to the Web. This is how and why your visitors can access it at any time, for any location on Earth. In other words, Web hosting allows you to rent a space on a Web hosting company’s server and place your website there. Remember that only after you pick a domain name and hosting, you can proceed with building your website and setting up WordPress.
How to Pick a Domain Name and Hosting?
You can find numerous Web hosting companies online. They all offer different pricing plans that include a certain amount of storage, bandwidth (how much Internet traffic your website can handle), number of email accounts and more.
To make your life easier, I am going to recommend checking out BlueHost.com. The reason for this is because I’ve used BlueHost numerous times before and never had a problem with their services. Also, they are very affordable and offer highly competitive rates. I also shouldn’t forget to say that this Web hosting company is one of the recommended by WordPress!
Here’s how much a website would cost you (per month) if you decide to use BlueHost.com:
- The Basic Plan starts at $2.75 per month. It offers a free domain name, so you don’t have to pay for it somewhere else. Also, you’ll get 50GB of storage space, unmetered bandwidth, and ability to create up to 5 email addresses (emailadress@yourwebsite.com). You can also count on 99.9% uptime guarantee, which means that your website will always be online. This is an often-neglected piece of information, so many inexperienced website owners often end up with technical issues. This is not the case with BlueHost.
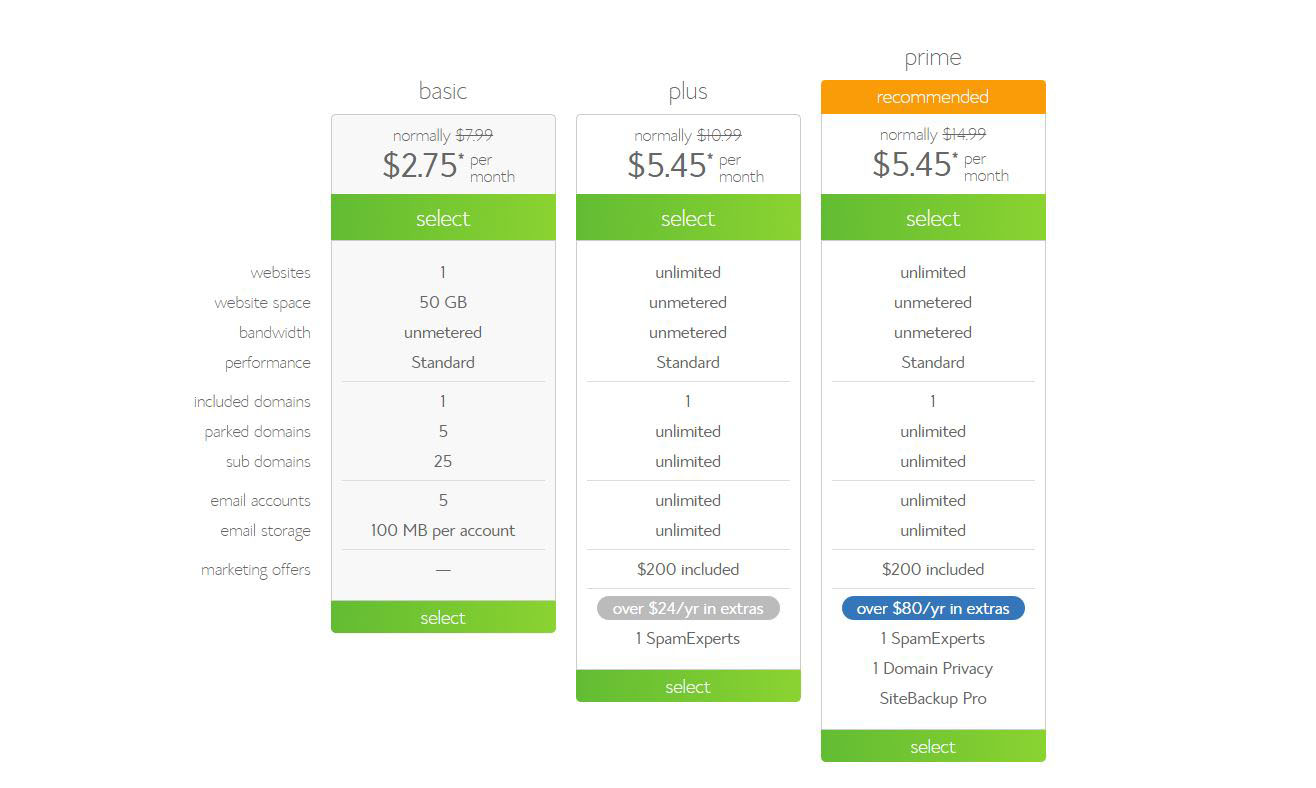
- I would also like to highlight another BlueHost’s plan: The Plus Plan. It is priced at $5.95 per month and offers everything you’ll ever need to build, maintain, and expand your website over time. It offers unlimited storage space, bandwidth, unparalleled performance (just like The Basic Plan), and unlimited email accounts. I firmly believe you’ll hardly find a better deal.
In case you’ve decided to go with BlueHost, I’d like to provide a guide to picking a domain name and package. This is how you can finish both of these tasks at the same time.
- Go to BlueHost.com, and you’ll see a green button that says ‘Get Started Now.’ You will be taken to another page with the overview of available hosting plans;
- This is where you can review your options. Even those the Basic Plan is sufficient for the majority of new website owners, take a look at the Plus Plan as well. Click on ‘Select, ‘ and you’ll be taken to a page where you sign up for a new domain name;
- Type your desired website’s address in the ‘New Domain’ section. As you’ll see, you can choose from different suffixes (like .com, .net, .org, as well as .website, and others). In case you already have a domain name (if you bought it from somewhere else) use the section on the right;
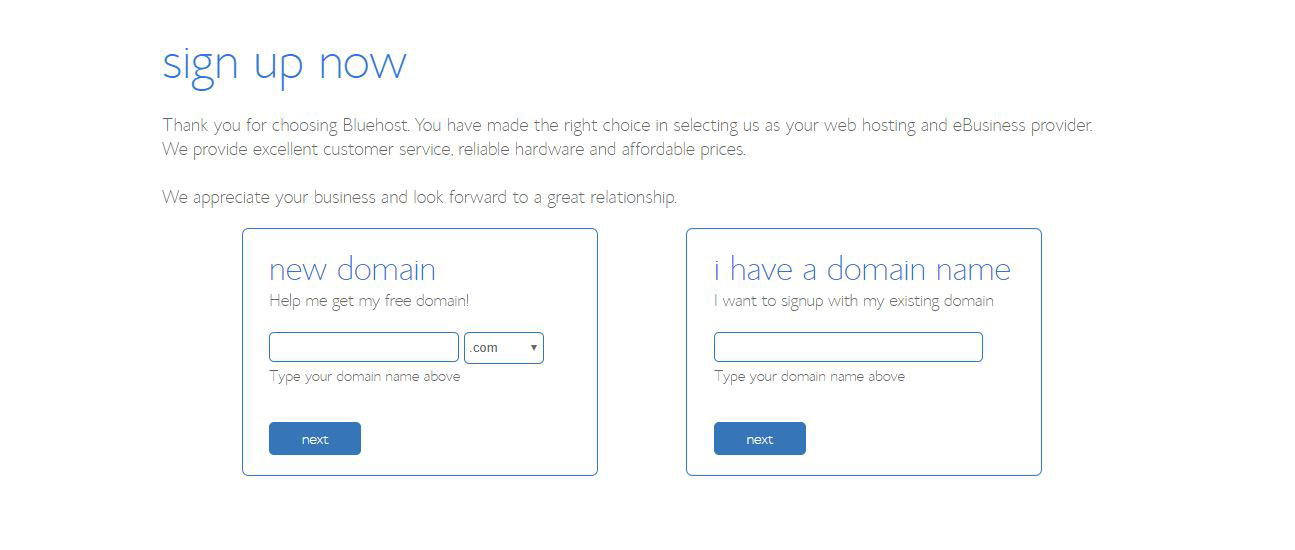
- The final step includes filling out a form that requires your personal information. These include your name, address, phone number, your current email address, and more.
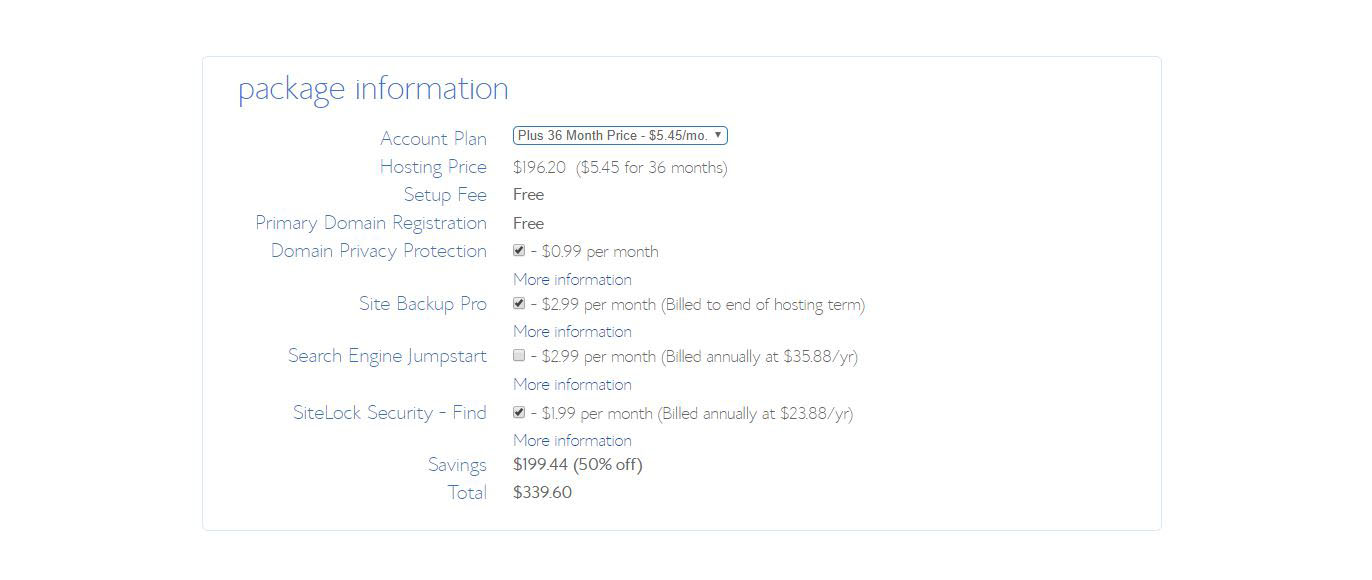
- Once you’ve filled out your personal information, you’ll be taken to a new page. As you’ll see, a list of add-ons will be available, like domain privacy, advanced backup, and more. In general, you’ll be okay without these add-ons even those some of them can be helpful. Either way, you can always choose an add-on at a later time.
Tips on Choosing the Perfect Domain
The best advice I can give you is that you shouldn’t rush with choosing your domain name. Trust me; you’ll be thankful for reading this section of the guide. Let’s first see why a domain is so much important, as well as how to pick the perfect one.
- Your website’s domain name is what makes the first impression. You want to pick something that’s easy to remember, so your visitors can easily recall the address down the road.
- It can significantly help you with Google rankings. Website owners want people to find their website easily. For example, when searching for something on Google and other search engines. Having a simple domain with a particular keyword included is always a better option.
- A domain name can be an opportunity to build your brand. Whether you’re a blogger or a company, a catchy domain can be a part of your branding strategy.
Now that we talked about why you should take a moment while choosing a domain, I want to help you with some tips. Hopefully, they will resolve any doubts.
- As said before, your domain can help you rank higher on Google. This is why you should research keywords. Think of several most relevant keywords that will be placed on your website. Then, try to incorporate the most relevant keywords into your domain name;
- Keep your domain name short. It’s hard to remember a lengthy URL address, which can turn some visitors away from your website. Just remember when’s the last time you typed 15 or more characters to visit a website. Some reports have shown that a domain with around six characters is the way to go;
- Aside from picking something short, pick something that’s easy to spell and pronounce. You don’t want to make a mistake of turning your visitors away because they don’t know how to pronounce your Website’s name or have a hard time remembering how to spell it.
- If you’re having trouble coming up with a domain name, there are online tools that can help you. Search for domain name generators on the Web, and you’ll see that plenty of useful options await.
Installing WordPress and Setting Up Your Website
Now that you have a chosen domain and hosting let’s build our very own website. The first step is to log in to your BlueHost account, where you can check out different kinds of information. This is also where you’ll find the company’s well-known and easy-to-use WordPress installation. The following steps will show you how to do that.
BlueHost’s One-Click WordPress Installer (The Easiest Method – Recommended)
- Go to BlueHost.com and log in with your user credentials. At the top of the screen, you’ll see the ‘Login’ option within the main menu. Click on it, and you’ll soon see a form where you need to enter your username and password;
- Welcome to BlueHost’s newly redesigned dashboard. This is where you can review your information, register a new domain, add different services, and more. We want to install WordPress and launch our website, so we’ll click on the ‘Marketplace’ option in the left-hand menu;
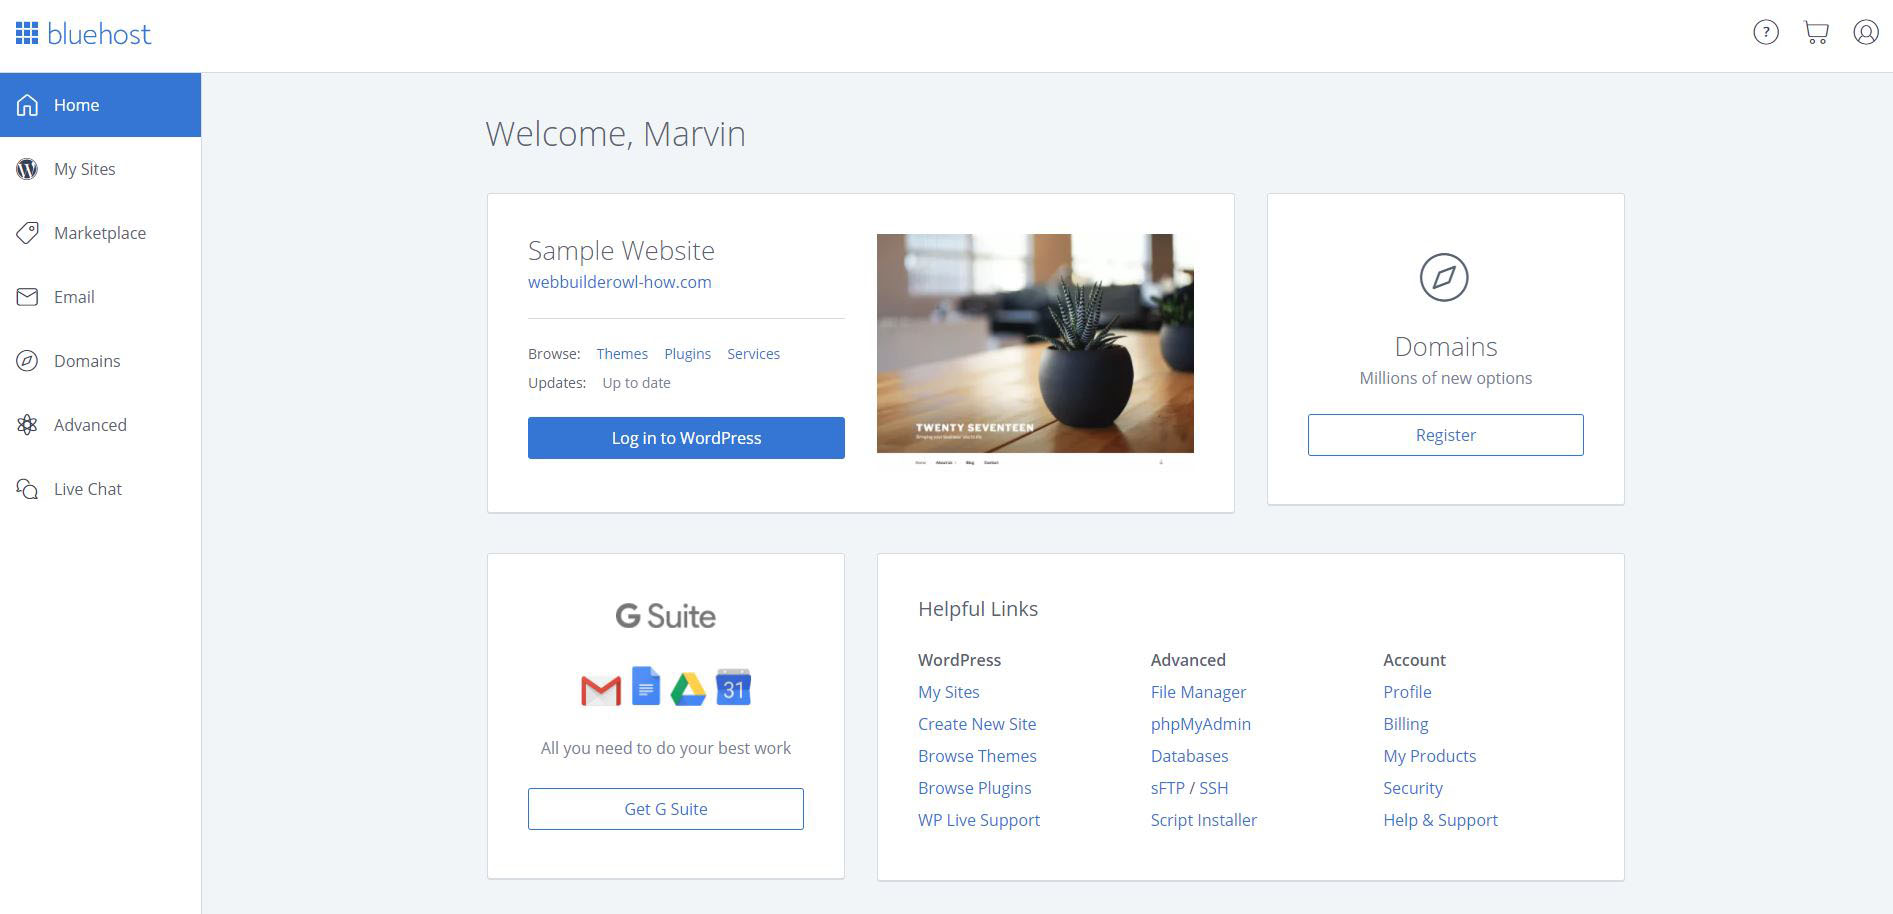
- BlueHost’s Marketplace brings different applications and services that you can add to your account. Scroll down until you see the ‘Featured Products’ section. You’ll see a menu just below the title that shows options like Popular, Themes, Services, Add-ons, Plugins, and One-Click Installs. When you click on the last one you’ll see a list of available CMSs;
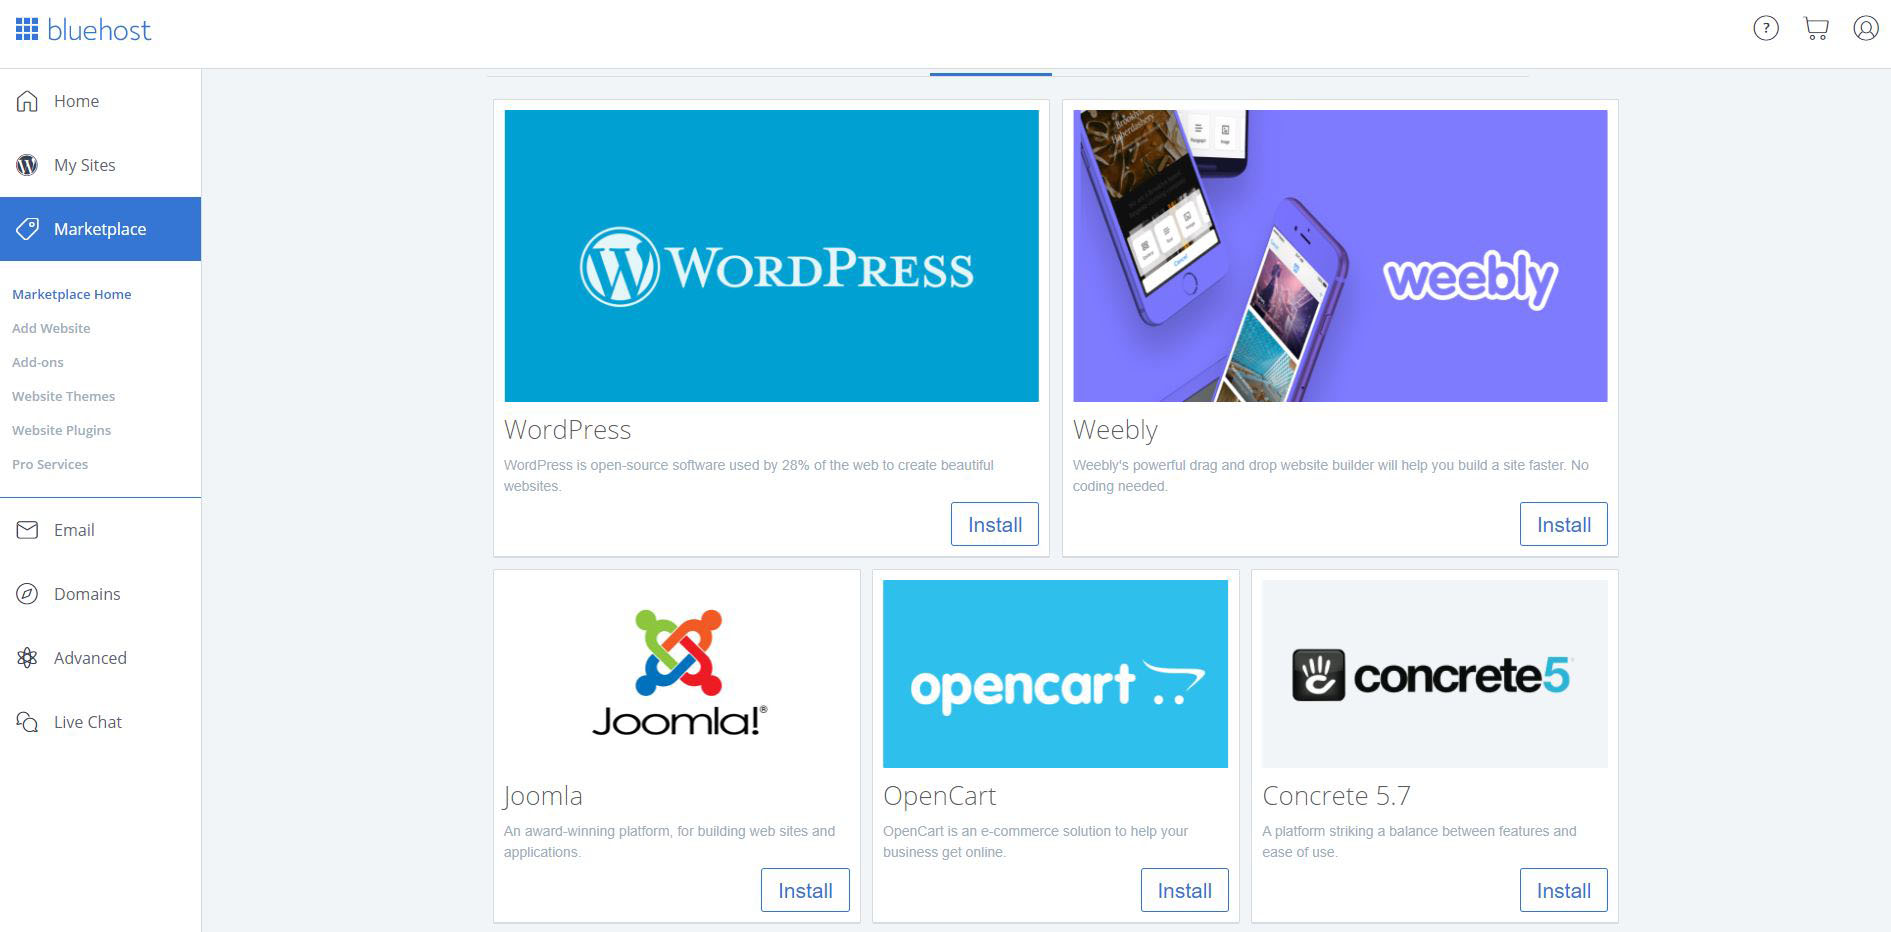
- WordPress is going to be the first available option. Click on the ‘Install’ button to begin;
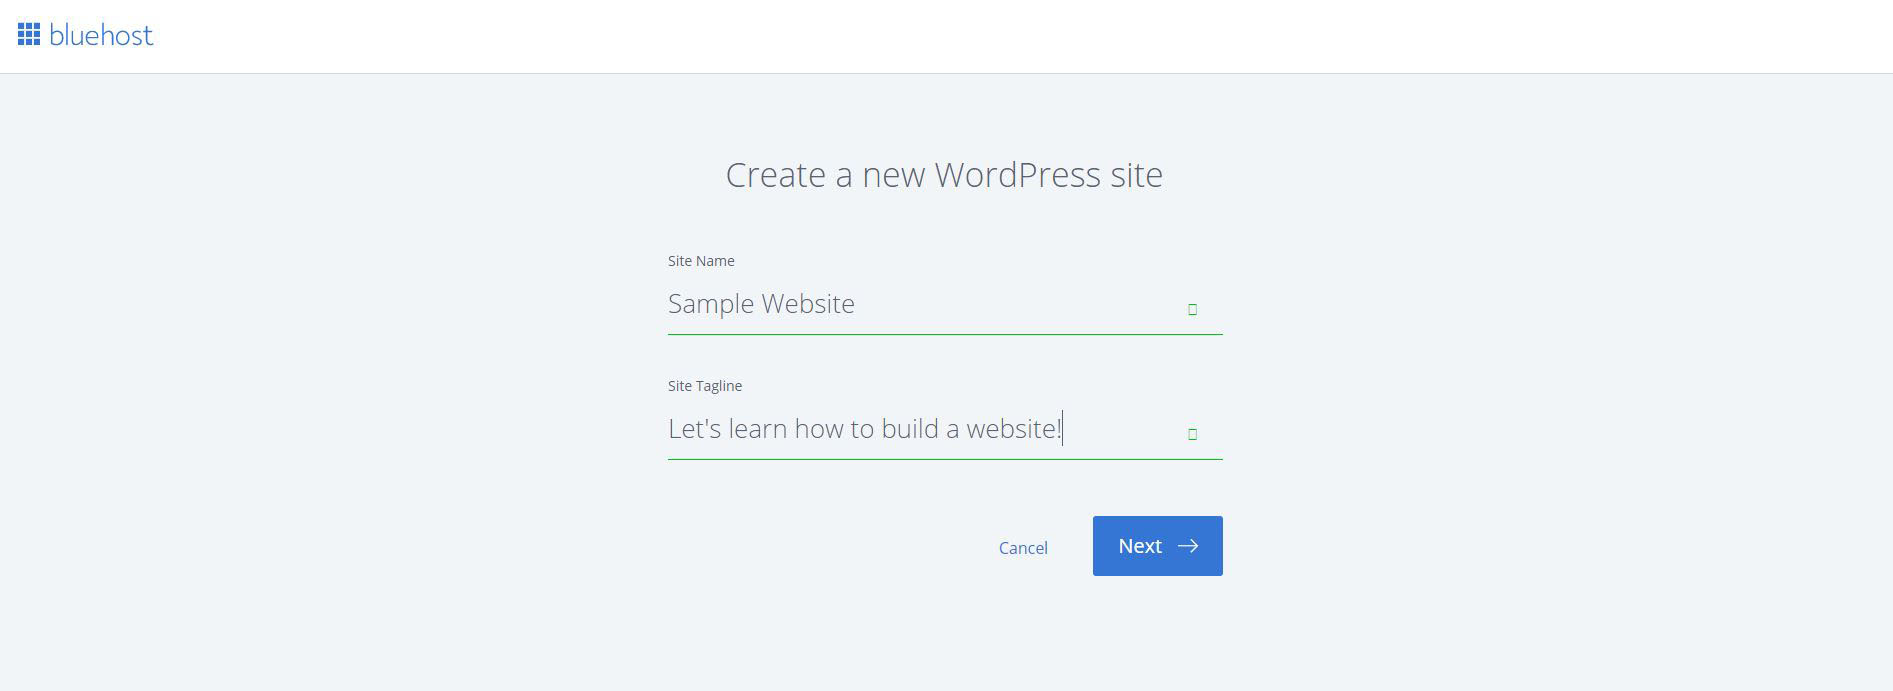
- You’ll see a new page that shows a simple form. You’ll need to fill out the following two fields: Site Name and Site Tagline. Click ‘Next’ when you’re finished;
- Now you need to select your domain and directory. Your newly registered domain will appear by default, and there’s no need to pick a directory. Two plugins will be offered by default: WP Forms and Opt-in Monster. These help you build forms and lists of subscribers, so you can use them if you want. Note that you can remove these plugins and add new ones at a later time from your WordPress dashboard.
- Click ‘Next, ‘ and you’ll see a notification that WordPress is being installed;
- Hopefully, you’ll get to the final step that lets you know that WordPress is now installed. Make sure to copy your new WordPress username and password since you’ll need those to log in to WordPress;
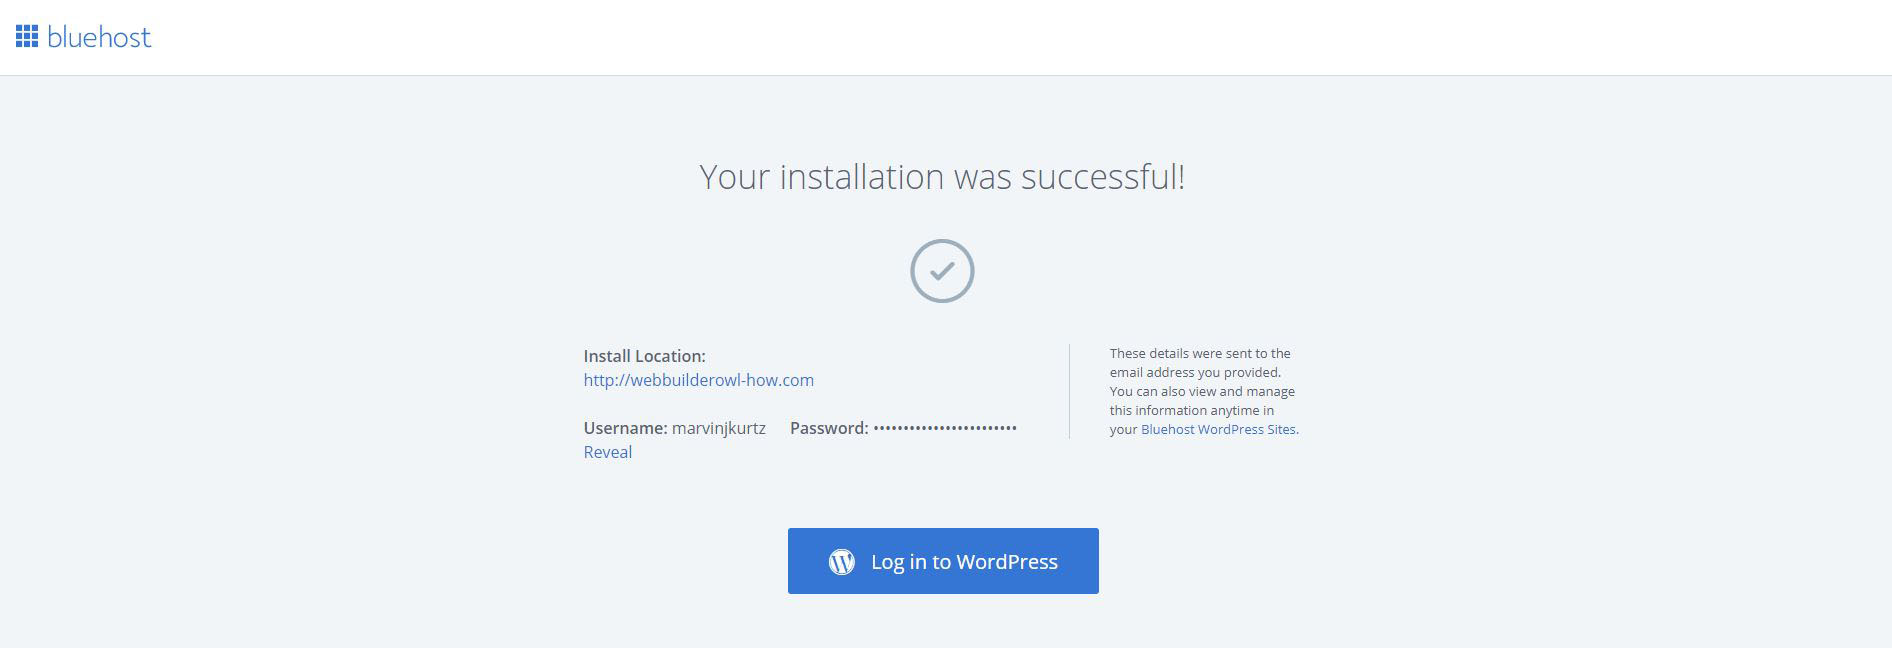
- To access your WordPress dashboard, click on ‘Log in to WordPress.’ This will take you to this CMS’s main window where you’ll modify your website and add new content.
- That’s it! You’ve successfully installed WordPress.
Install WordPress Manually (Medium Difficulty – Not Recommended)
Sometimes you’ll hear that installing WordPress manually is the best method. The truth is that when you use BlueHost’s one-click installer, you’ll end up with the company’s plugins that connect your WordPress directory to your BlueHost’s account. This can be seen as bloatware (unneeded apps bundled with WordPress). However, I recommended using the one-click installer if you’re facing WordPress for the first time.
In case you want to install WordPress on your own, I’ve got you covered. Here’s how it’s done:
- First, you need to download WordPress to your computer. Follow this link to download the ZIP file;
- Now you need to unzip the file you just downloaded and upload the files to your FTP account. In other words, we’ll upload the files to your website. This is done by using an FTP client. FileZilla is an attractive option. Make sure to download it and install on your computer. Every FTP client will ask for your website’s address, username, and password. You receive that information when you sign-up for a domain and hosting.;
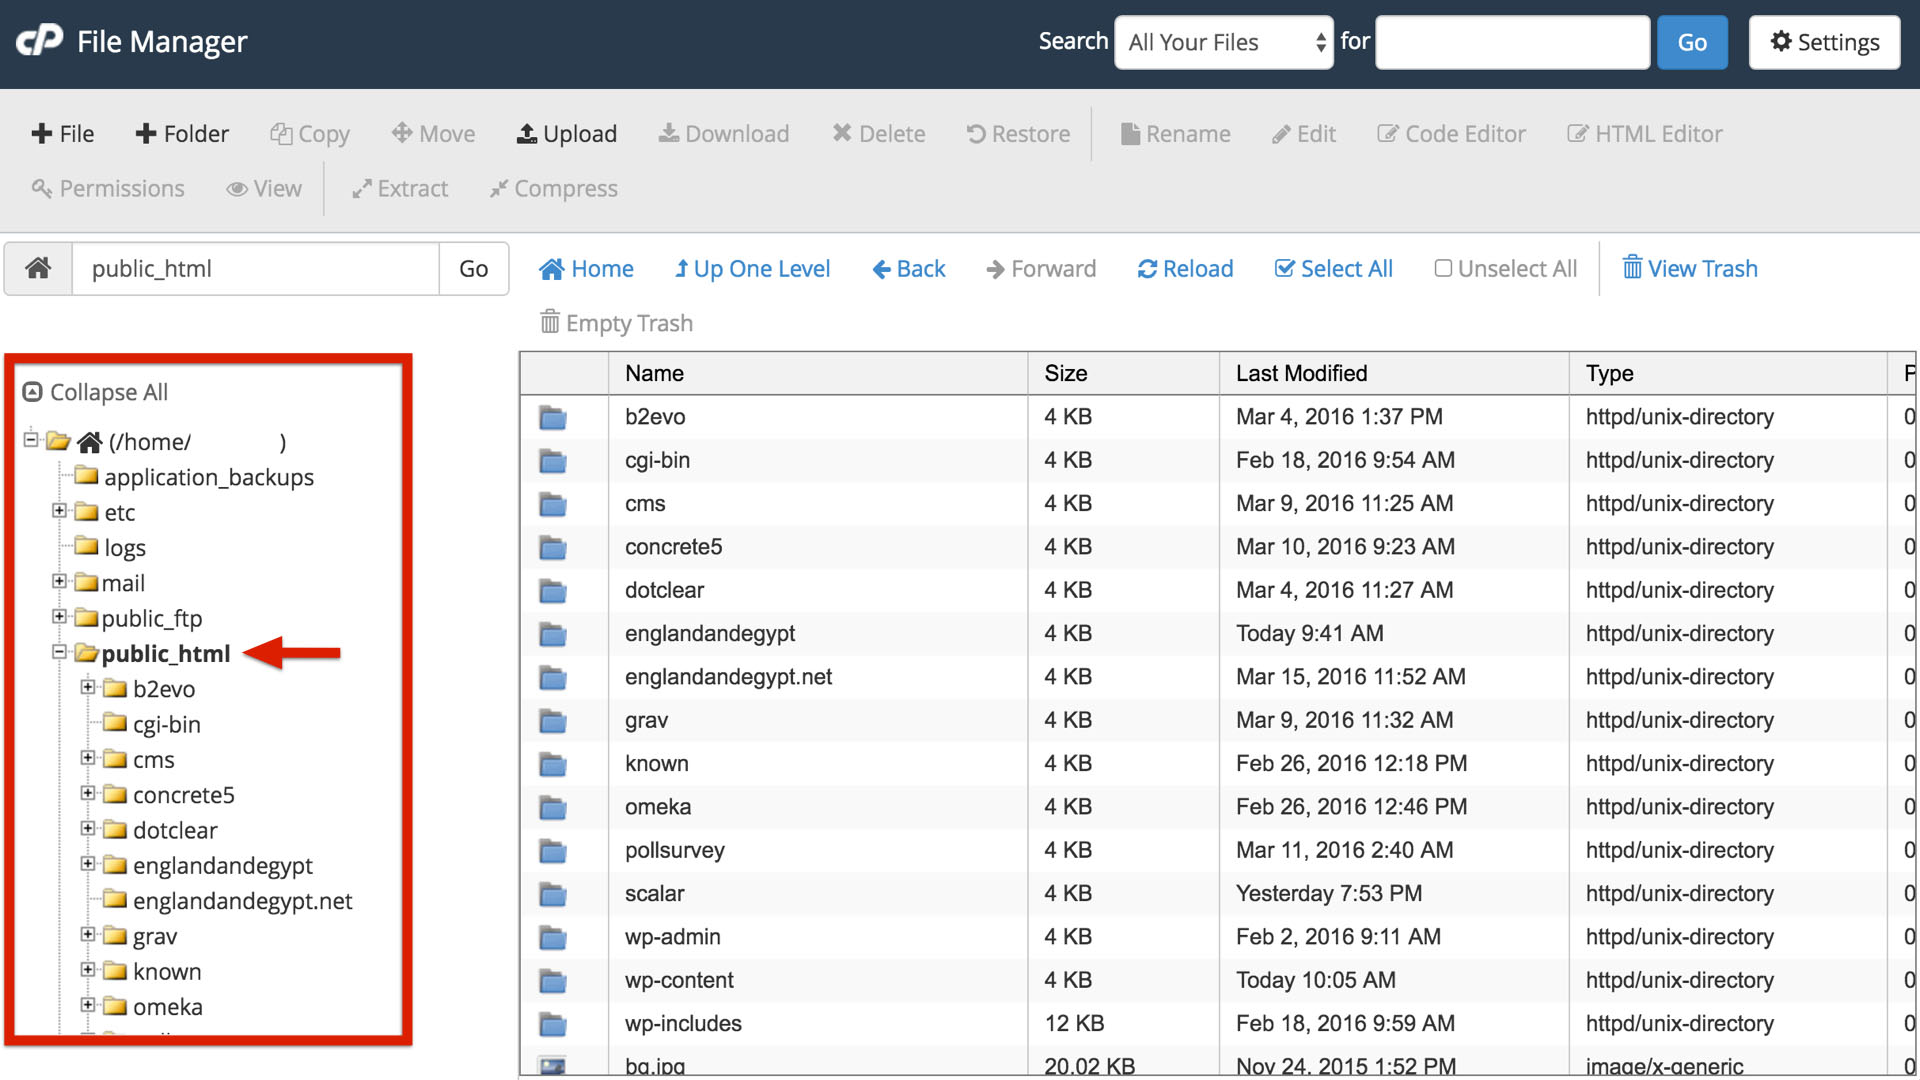
- Open your FTP client and enter the needed information. The application will connect to your website and show a list of available files. You’ll need to open the following directory: public_html. Once opened, upload files that you unzipped previously (WordPress files);
- After uploading the file, you need to create a new SQL database. This option can be found when you log in to your BlueHost account. In the left-positioned menu click on ‘Advanced’;
- What you should see now is your cPanel. This is an advanced tool for controlling your website and reviewing its performance. Find the ‘MySQL Databases’ and open it;
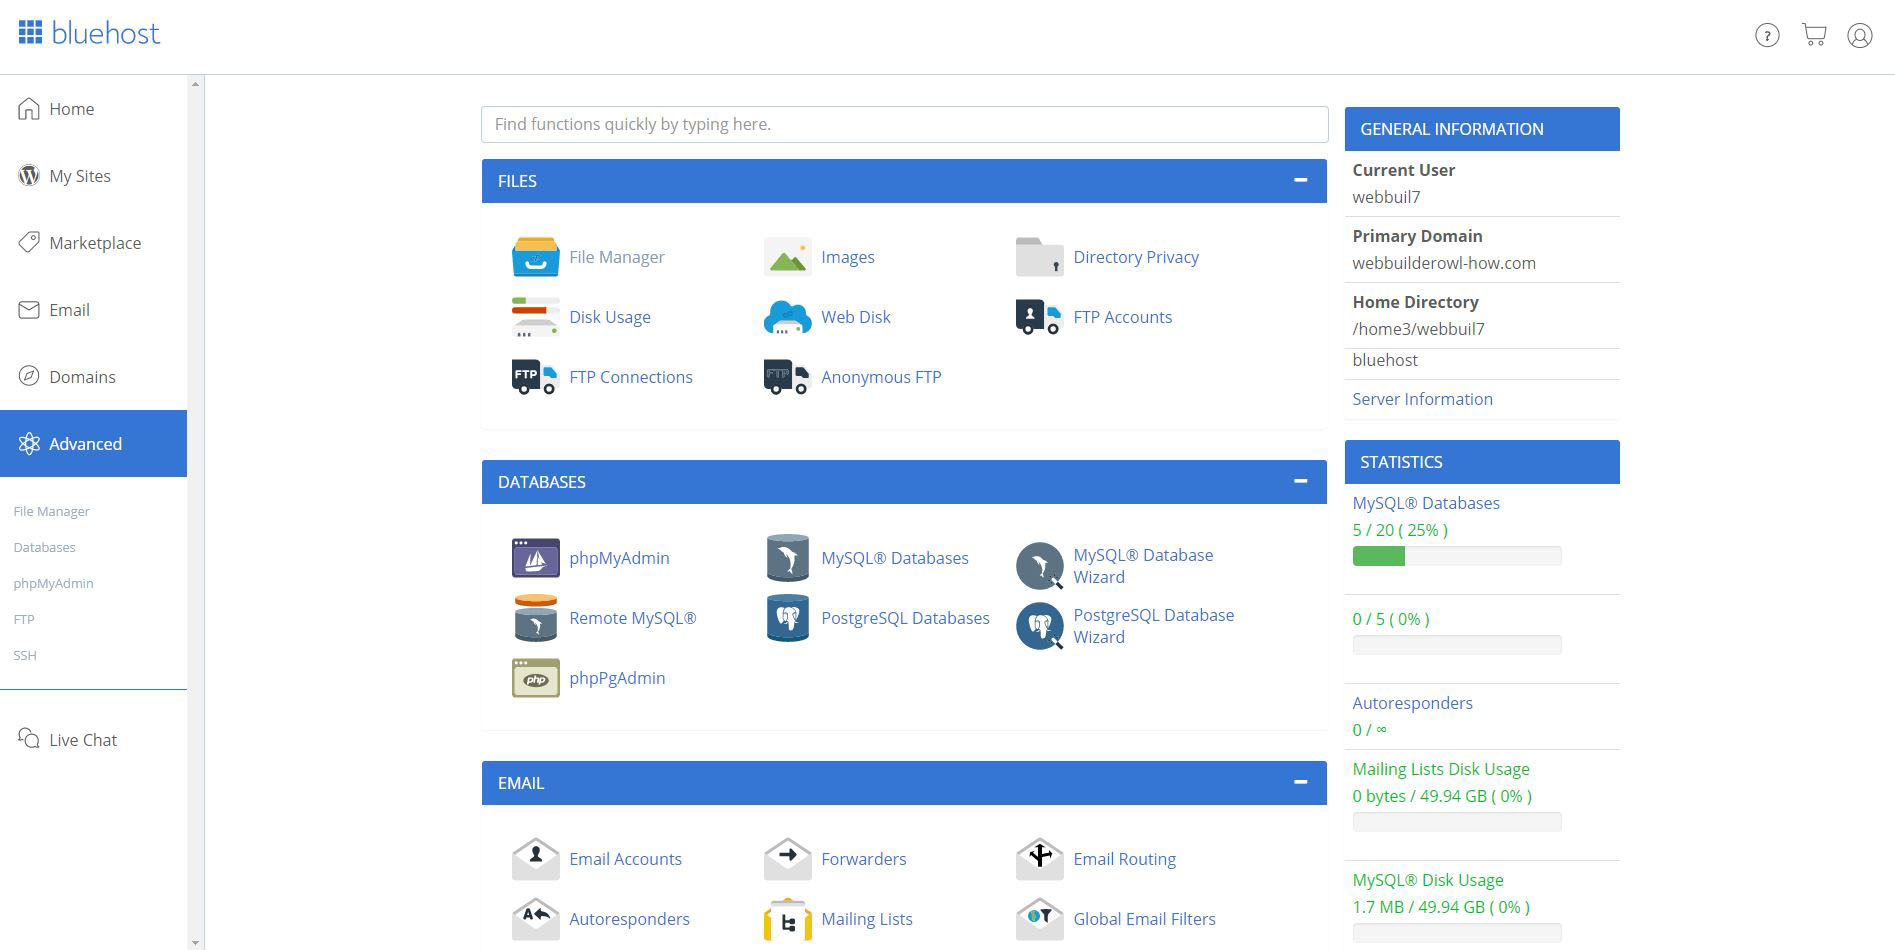
- We need to create a new database. You’ll see the ‘Create New Database’ option where you’ll need to enter a name. Name your database, and finalize the procedure;

- Once finished, you need to create a new user. Scroll down to MySQL Users and pick ‘Create a User.’ You’ll need to enter a new username and password.
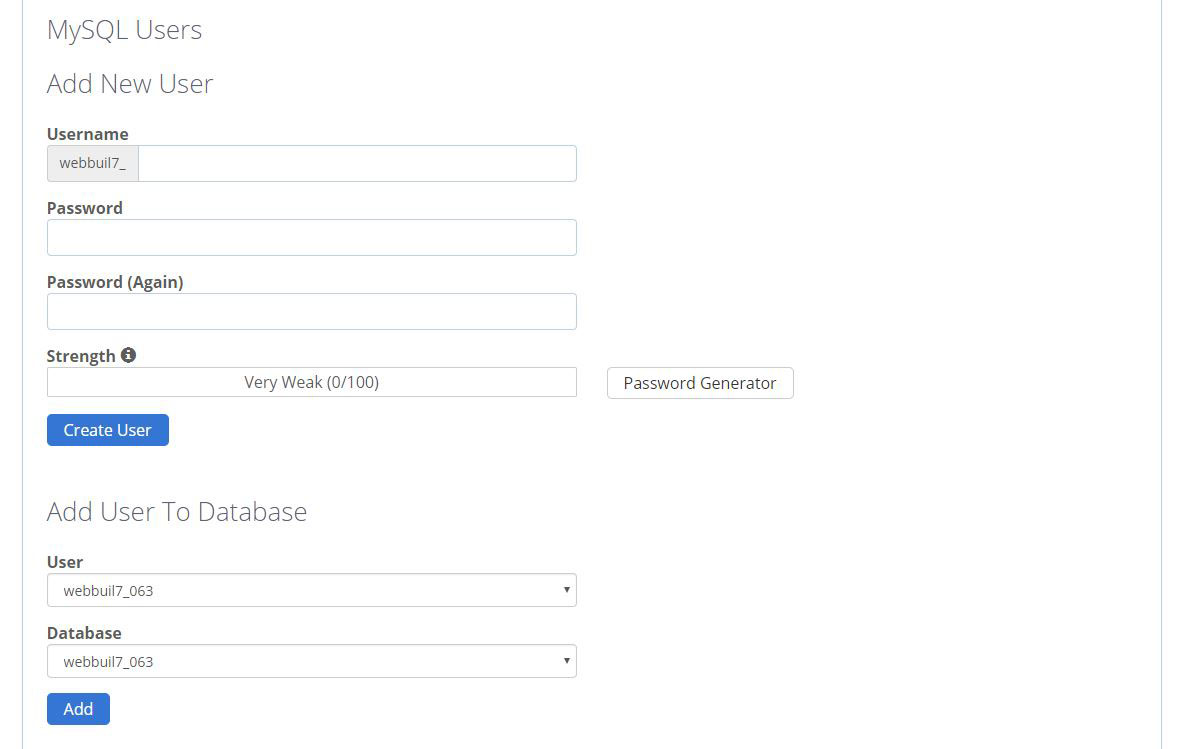
- Finally, we need to add a newly created user to the database we previously created. On the main MySQL Databases screen scroll down to ‘Add User to a Database.’ Pick the user you created and associate it with the database.
Let’s take a break and see what we’ve done so far. First, we downloaded WordPress files and unzipped them. Then, we used an FTP client to upload those files to your website’s public directory. Finally, we created a new SQL database and a new user. Now it’s time to finalize the WordPress installation.
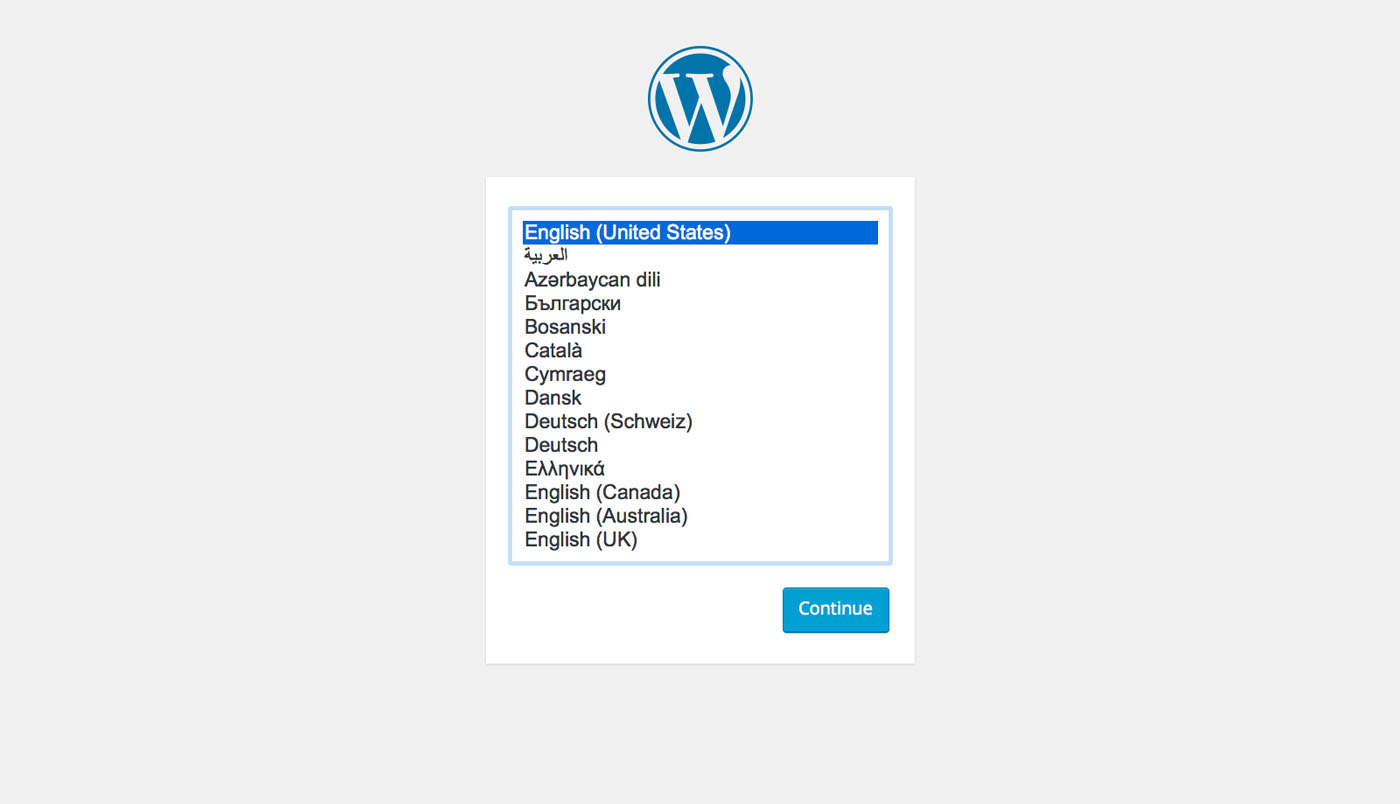
- Open your website’s URL in your Web browser. You will see the first installation step that lets you pick your preferred language. Click on ‘Continue’;
- The second step tells you what you need to have to finish the installation. Click on the ‘Let’s Go’ button to proceed;
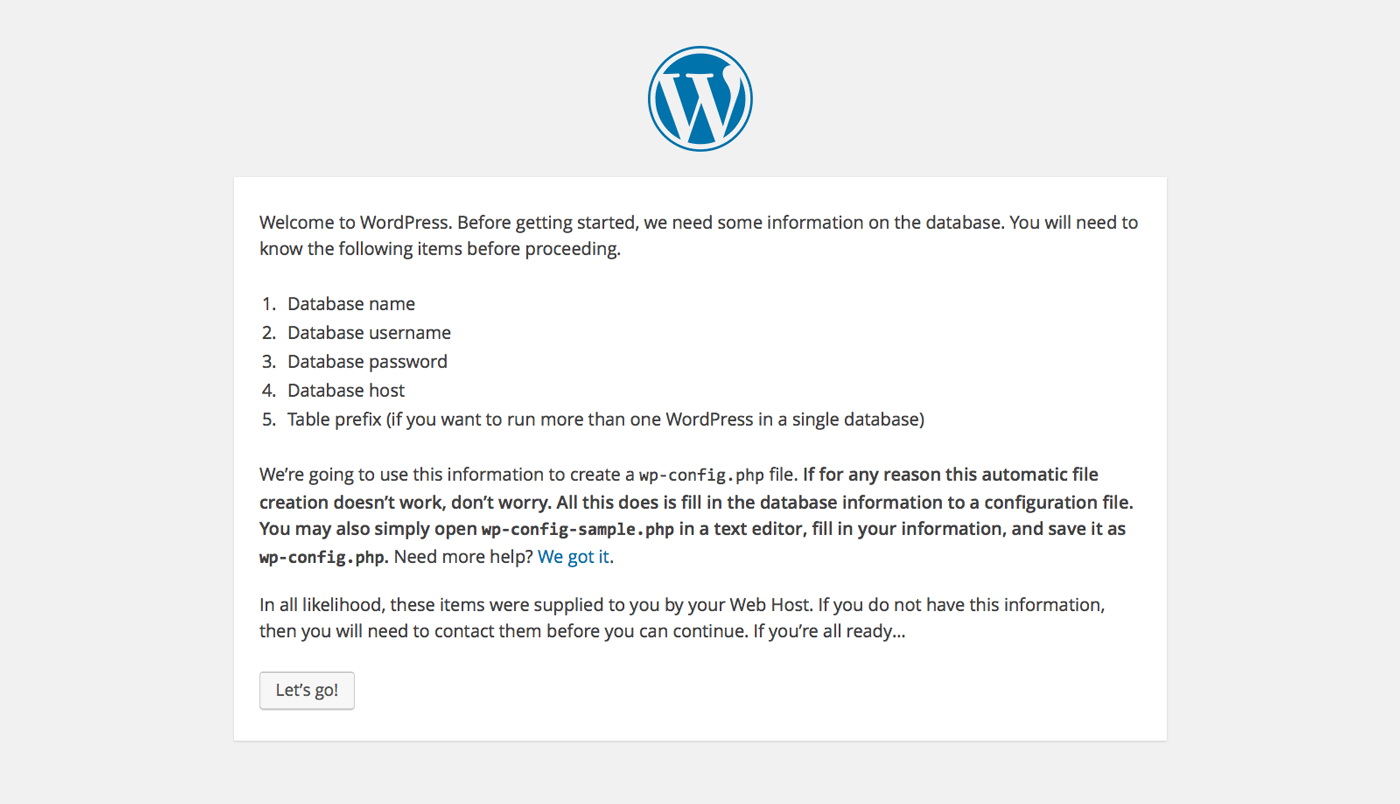
- The third step consists of connecting the newly created SQL database to WordPress installation. Fill out the needed information and continue to the next step;
- Once everything is correctly filled out, it’s time to run the installation. Click on the ‘Run the Install’ which should take you to the final step after a minute or two;

- Welcome to the final step! You will be asked to name your website and add a new user. This username and password will be used to login to WordPress, so make sure to remember them;
- Open WordPress, log in, and you’re ready to go. Congratulations!
STEP #4
Let’s Make Your New Website Pretty!
Finally, we’ve come to the fun part of Web design. The first thing you should do is to pick a theme for your site. The choice is going to be tough since thousands of beautifully designed themes await.
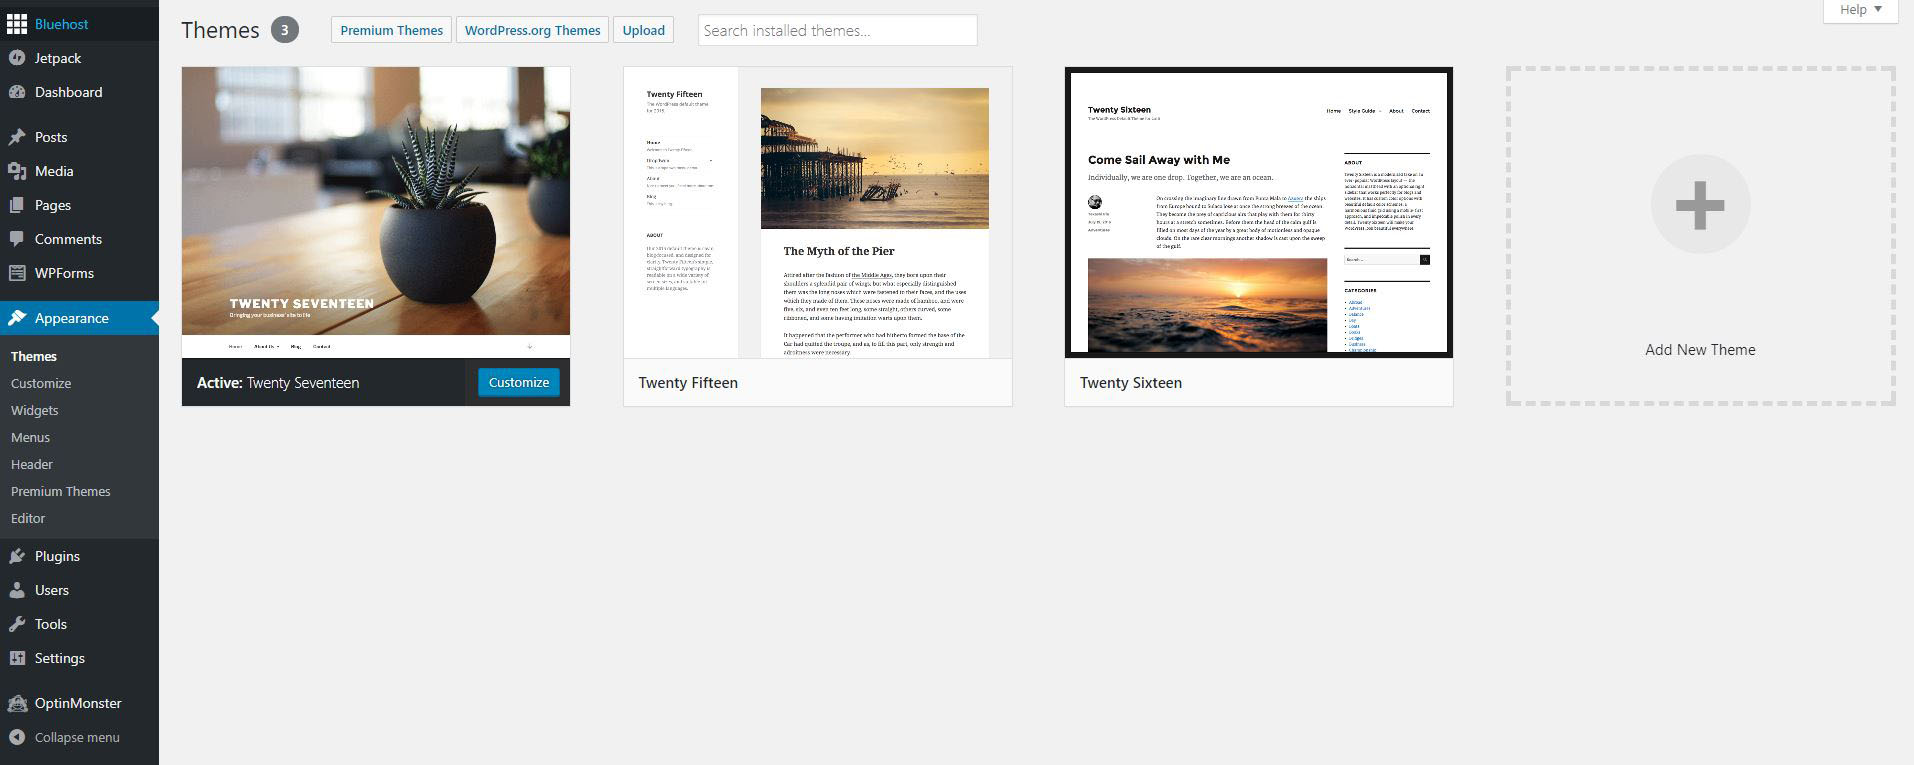
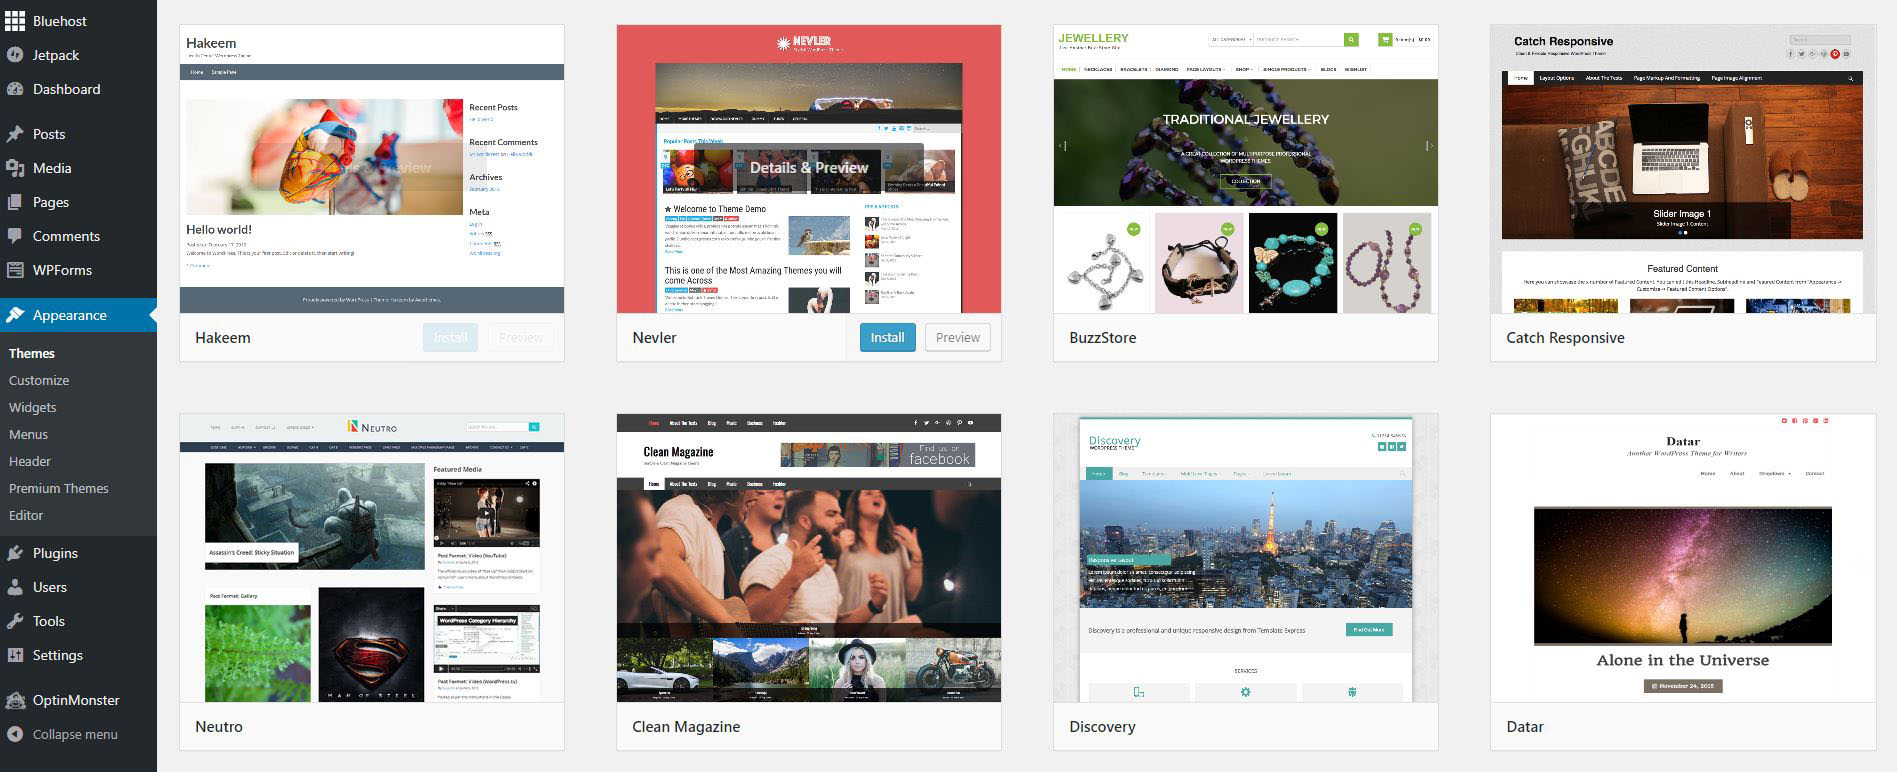
To find available themes, login to WordPress. In the left-positioned menu, click on ‘Appearance.’ You will see that three themes are currently available, which means they have been downloaded by default. To find available themes, click on the ‘WordPress.org Themes’ button. You will be presented with thousands of free-of-charge templates. When you hover over their images, you’ll see that you can preview every one of them. Take your time, browse the themes, and enjoy in what WordPress has to offer. Once you’ve made up your mind, click on ‘Install.’ After a couple of seconds, click on ‘Activate’ so that the chosen theme becomes active.
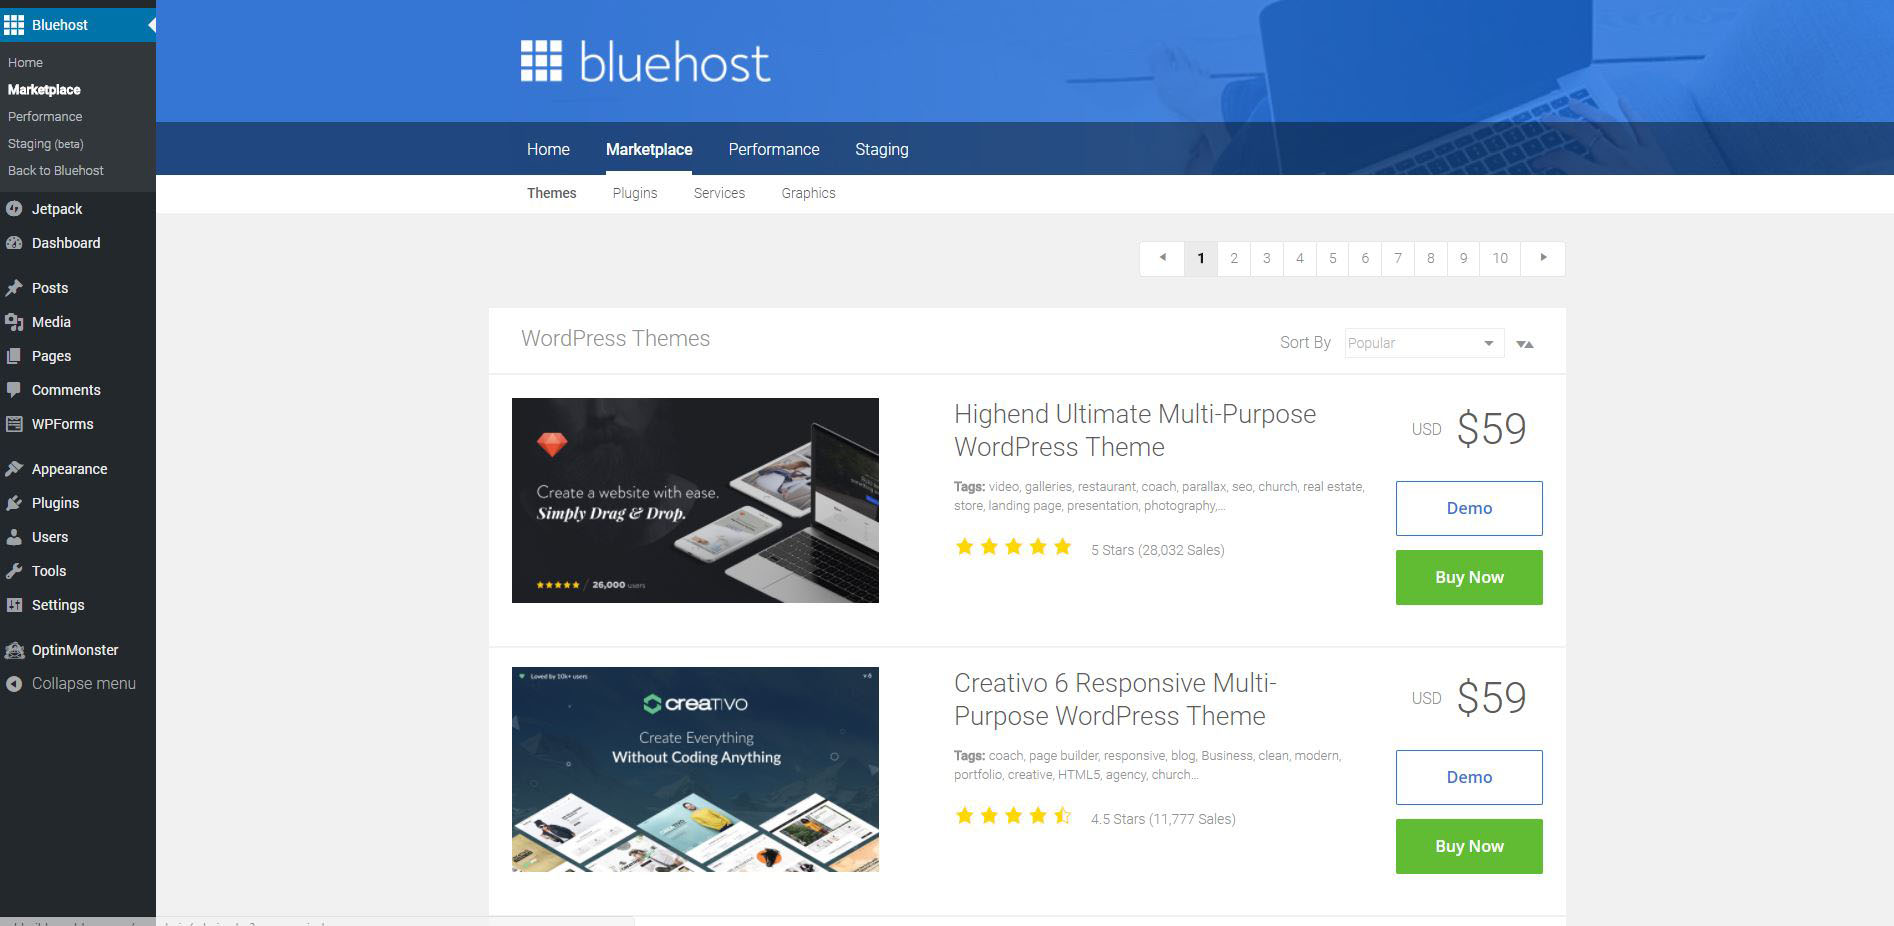
In case you can’t find the theme you like, you can also take a look at premium-priced themes. These can be found in the top-positioned menu, under the ‘Premium’ section. What you’ll be presented with is BlueHost’s marketplace of premium themes. Just like with free themes, you can check out live demos. Also, you can sort the available themes by popularity, price, and date added. As I advised you previously, don’t rush during this step. Try to imagine how you want your website to look like and find the theme that will get you there. In case you opt for a premium theme, click on ‘Buy Now’ and finish the procedure by finalizing the payment.
It is also worth knowing that you can find great premium-priced themes elsewhere on the Web. For example, Theme Forest is one of the most popular options, in addition to the MyTheme Shop. When you buy a premium theme from a third-party marketplace, you’ll get to download the theme files. What this means is that you need to upload those file to WordPress. This is how it’s done:
- Open your WordPress dashboard and navigate to ‘Appearance’ from the left-positioned menu;
- Find the ‘Upload’ option where you’ll be taken to a new page;
- Finally, click on the ‘Upload Theme’ and you’ll see an option to upload the file. Note that you must upload the ZIP file of your theme, just like you downloaded it from the Web. WordPress will unzip the file on its own and install the theme;
- Once installed, you’ll get to see your new theme among the available ones. You can preview and activate it.
You Have a Nice Theme – Now You Need Some Content!
Up until now, you should have picked the theme you’d like to use. A theme will dictate how your website looks. For example, it automatically applies certain layout, colors, and fonts. What you need now is to add some pages, posts, and build a menu. Let me show you how to finalize your website. But first, let’s see what pages and posts are and what are their differences:
- PAGES: You can think of pages as static articles. For example, your website might have the following pages: Homepage, About – where you present yourself to the world, Blog – where you publish blog posts, and Contact. All of these are static pages that don’t often changeoften, except for your blog.
- POSTS: Posts are regularly published articles. When you’re finished writing an article, you publish it on your Blog page. As you write and publish new articles, they will be posted on top of your existing ones. What this means is that your latest article will appear first, following by older articles.
Naturally, you need to create pages first and then associate posts with them. Let’s see how to build a new page:
- In your WordPress dashboard, click on ‘Pages’ in the left-positioned menu;
- You’ll see a list of available pages. By default, you’ll see the ‘Sample Page’ already created;
- To create a new page, click on the ‘Add New’ button at the top of the page;
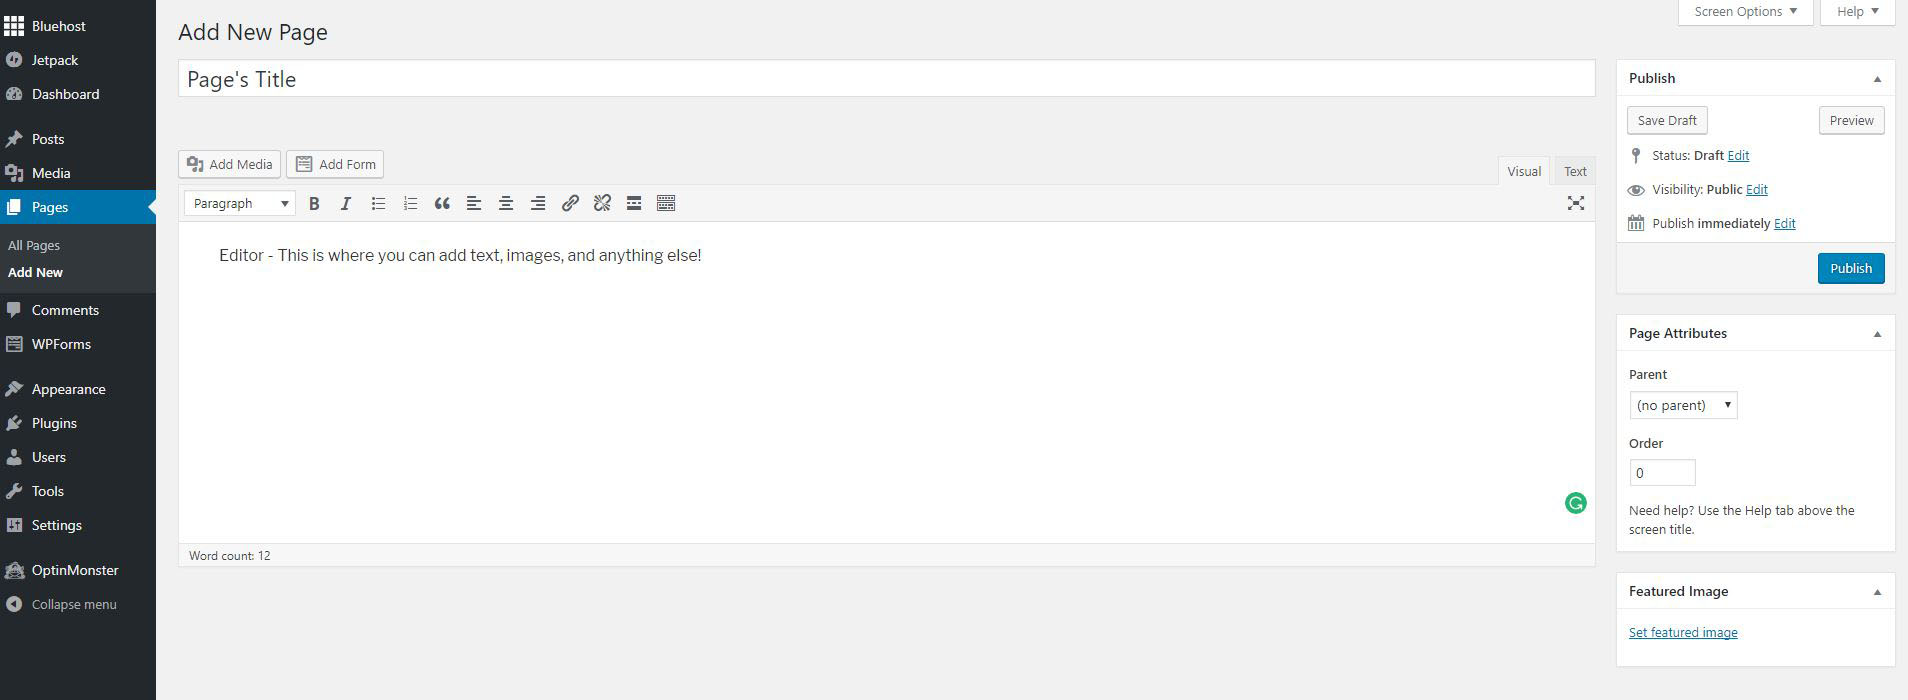
- Welcome to the page creation! You can name your page, which will create a new URL. For example, if you name your page ‘About Me’ – the page’s URL will be yourwebsite.com/aboutme/. Below the title, you’ll see the editor. This is where you can add text, images, forms, and pretty much anything else. These elements will be visible when you publish the page;
- It’s also important to understand the options listed on the right part of the screen. You will see three groups of options named Publish, Page Attributes, and Features Image. The first one allows you to publish your page, make it public or private, as well as to make your page visible at a later time (scheduled publishing).
The Page Attributes section allows you to pick a parent page. For example, the About Me page won’t have a parent. What this means is that the About Me page will be one of the main pages, like the Homepage, About Me, Blog, and Contact. If you select a parent, that page will be ‘under’ a certain page in your website’s hierarchy.
Finally, we’ve come to the ‘Featured Image.’ You can use a beautiful and large image to represent your page. Some themes don’t use this feature, while others do.
- Once you’re happy with your page, publish it. You can also return and make changes, but remember to re-publish it every time you add something new.
Creating a post is very similar to creating pages. This is done by choosing ‘Posts’ from the left-positioned menu.
- When you click on ‘Posts,’ you’ll be presented with a list of available posts. There’s only going to be one to start with – the sample post. The create a new post, click on the ‘Add New’ button at the top of the screen;
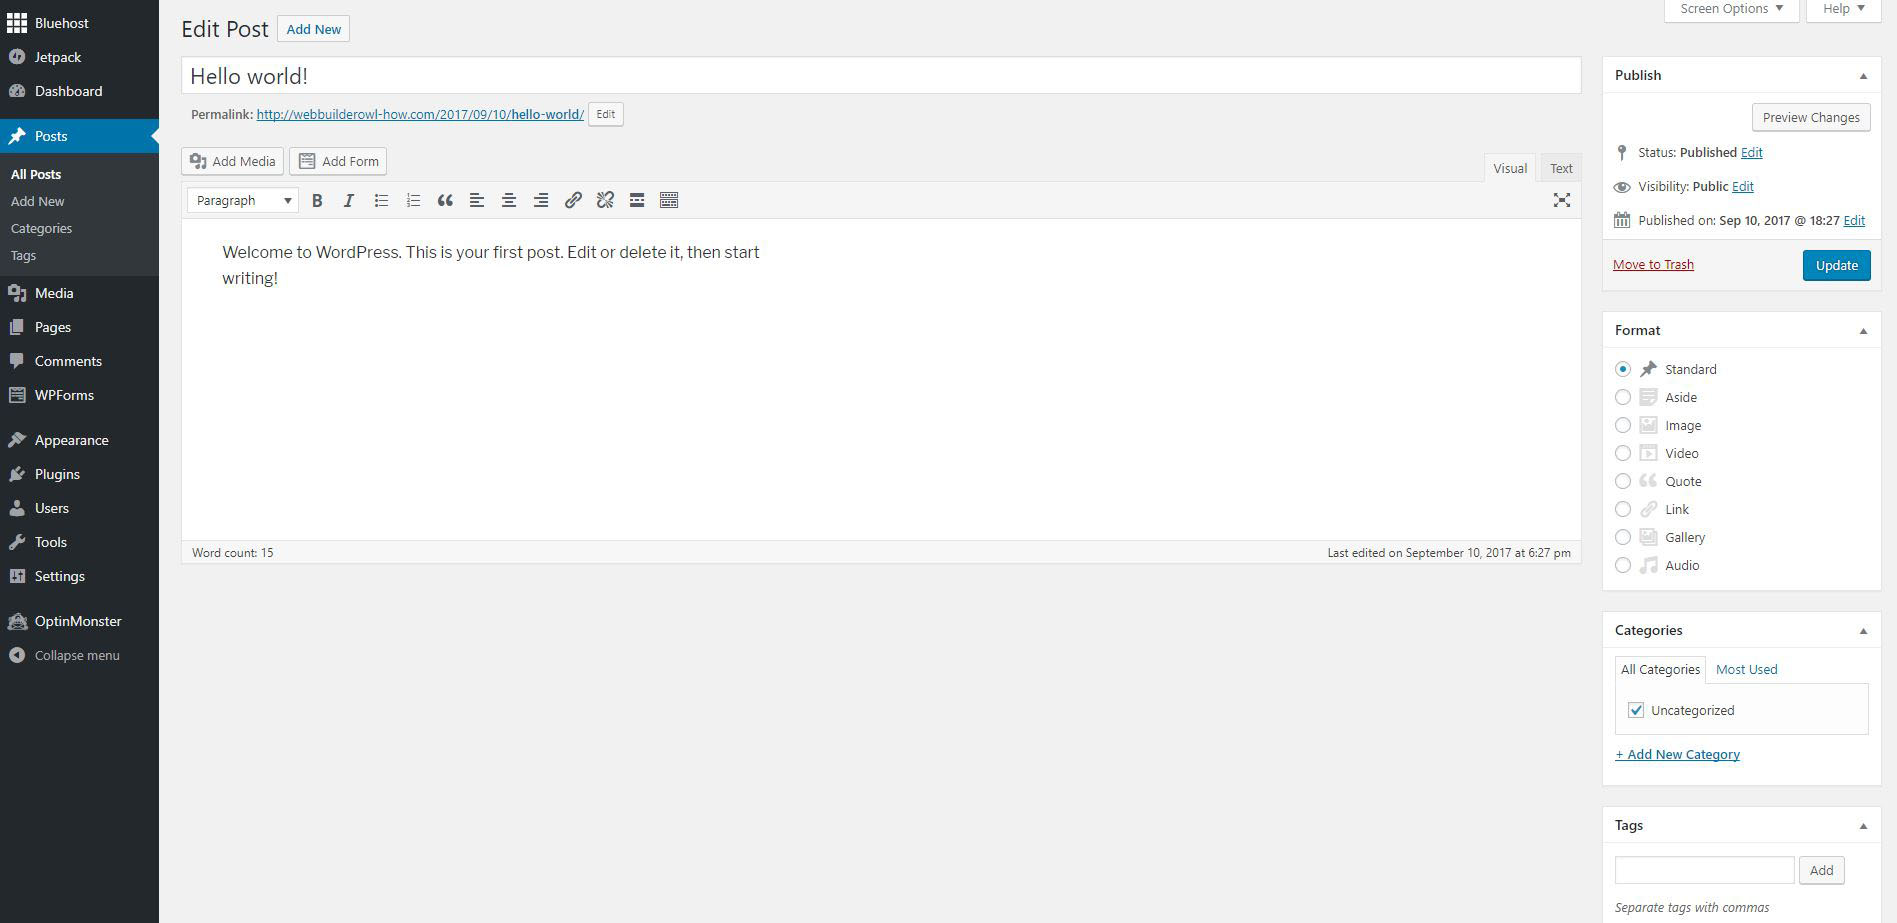
- Welcome to the post creation screen! Even though it looks very similar to Page creation, there are some significant differences. First, you need to name your post which will generate a new URL – just like with pages. Below, you’ll find the editor where you can add text, images, videos, and pretty much everything else.
- Now, let’s take a look at options listed on the right side of the screen. The Publish section is the same as on the Page creation screen. You can make your post visible or private, and scheduled to be published at a later time.
Below you’ll find the Format section. The looks of this section will depend on the theme you picked. This is where you can create special-looking pages like galleries if you’ve chosen a photography portfolio page. In most cases, the first option (Standard) will work.
Next, there’s the Categories section. If you plan on writing different kinds of posts, make sure to add new categories. For example, if you intend to build a business website, your categories can be News, Announcements, Product Reviews, or anything else. This will help your visitors to sort your posts at a later time.
- Next, you can add tags. This is yet another way to categorize your blog posts. While categories can be large in nature, tags are specialized. For example, you can create a category named Product Reviews where you can review tech products. Tags can be smartphones, earphones, laptops, and similar.
- Finally, we’ve come to the Featured Image section. Note that your post’s featured image is very important. It will represent your blog post on your website so make sure to use a beautiful image.
By now, you’ve learned how to add new pages and publish new posts. All there’s left is to create the main menu and allow your visitors to find their way around your website.
Make Your Website Whole – Add the Main Menu!
Adding the main menu to your website is incredibly simple. This is one of the ways WordPress translates complex operations into simple actions. Let’s take a look at how you can create the main menu.
- From your WordPress dashboard, navigate to ‘Appearance’ > ‘Menus’ in the left-positioned menu;
- You’ll see a new screen used to build menus. To start, enter a new name for your menu and click on the ‘Create Menu’ button. You can name it ‘Main Menu’ so you can easily find it later;
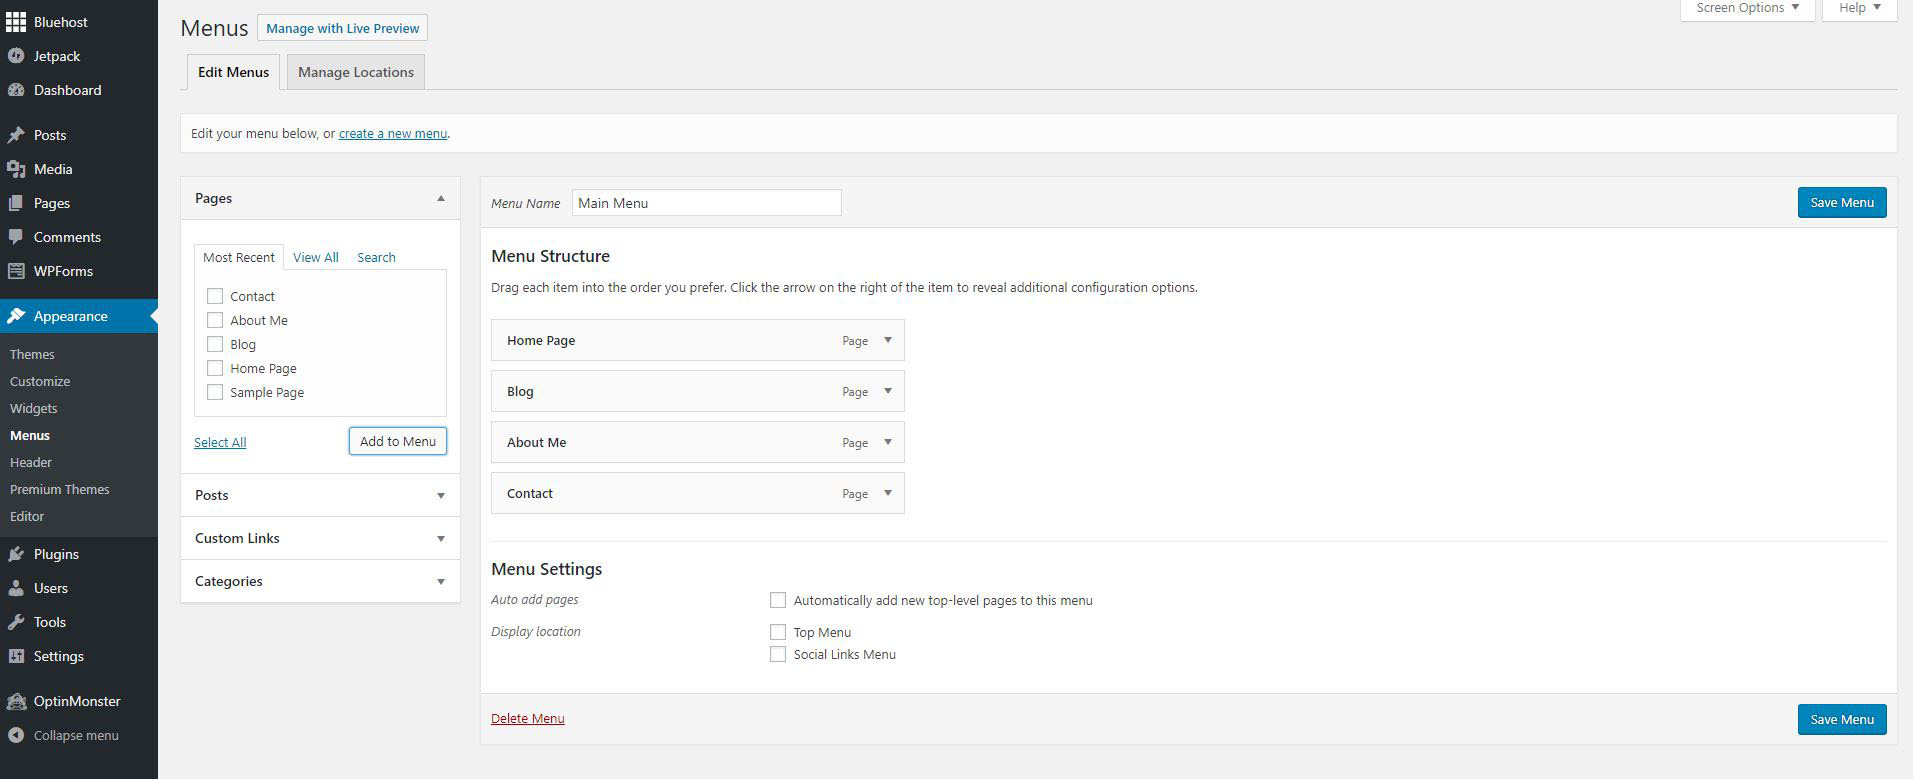
- You create a menu by selecting your pages from the left-positioned section. Choose the pages you’d like to add and click on the ‘Add to Menu’ button. They will be moved to the right side, under ‘Menu Structure’ section;
- When you’re happy, click on ‘Save Menu.’ This will publish your new menu immediately. As you can expect, you can always return and make changes.
Conclusion
The main goal of writing this guide is to help you realize that building a website isn’t hard. I understand that signing up for a domain and hosting and setting up WordPress can be a bit daunting. However, this is something you must go through to get to the fun part. Once you get to WordPress, it’s all fun. I am sure you’ll spend a lot of time perfecting your new website.
Thank you for sticking with me ‘till the very end. I hope you found this guide helpful as well as that you’re well on your way towards having your website.